Fun times are had but soon it's serious business again. The group finds Arantor's lair!
When the PCs reach the precipice that affords a
view of the lower cavern, read:
Below you paces a huge skeletal dragon, shaking its head
from side to side and muttering “Oh, no…oh, no…” The
dragon is within a chamber more than a hundred feet long,
with alcoves and crevices along the periphery. Stalagmites
and stone pillars dot the landscape, and gray mist coheres
in low spots on the cavern floor.
Along the western wall is a circular portal limned with
lightning. You can see shimmering movement within the
dark circle, but from this vantage point, you can’t make out
what lies beyond.
Arcana or Religion Check
DC 26:
The areas of strange mist scattered around
the cavern are laden with memories tied to the dark lord,
Arantor. Perhaps what is contained within them could
prove useful in vanquishing him.
Dungeoneering Check
DC 23:
The hero notices that the subterranean stream
has weakened the rock in the marked squares to the point
where a sudden blow might shatter it.
http://www.fantasycartography....--Domain-Caverns.jpg
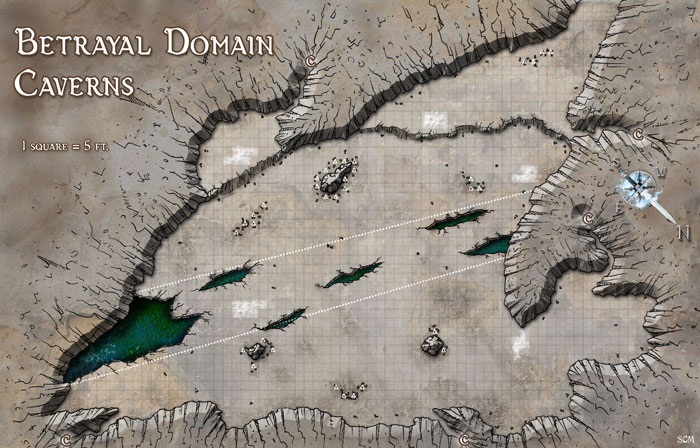
Features of the Area
Illumination: The cavern is dimly illuminated by
phosphorescent fungus, glimmering insects, and the
flickering balefire emanating from Arantor.
Stalagmites and Pillars: The large stalagmites
and pillars are blocking terrain, while the areas of
smaller stalagmites are difficult terrain and provide
cover to those behind them.
Shadowed Crevices: The crevices marked (C)
seem to extend farther than they should and rapidly
fill with strange mist and shadows. A character that
enters one of these crevices must spend one entire
turn navigating the oddly shadowed passage before
emerging, at the start of their second turn after entering, from a different, randomly determined crevice. A
DC 26 Arcana or Dungeoneering check made during
the turn spent in transit allows the player to randomly
select two crevices as possible emergence points and
then choose the one they prefer.
Subterranean River: An underground stream
runs just beneath the surface of the cavern in the
indicated squares. It flows to the southeast at a rate
of 4 squares per turn; move anything in the water 4
squares in the direction of the flow at the start of its
turn. A series of stalactites plunge into the river as it
exits the cavern; any character not actively attempting to dive below them is automatically stopped from
continuing downstream. Crawling out of the stream
and onto an adjacent square of rock counts as moving
through difficult terrain but is otherwise unimpeded.
Thin Stone: The stone over the subterranean
stream is quite thin, barely capable of sustaining the
weight of creatures standing upon it. Any melee or
ranged attack can target a square of the thin stone
instead of a creature. Bursts and blasts automatically
target all the squares in their area, treating them as a
single target. The stone has AC and Fortitude defense
of 20, with other defenses at 15. An attack that deals
more than 15 damage destroys the stone square(s)
it targeted. Anyone standing entirely on destroyed
squares of flooring drops into the stream automatically. Anyone standing partially on destroyed squares
of flooring is allowed a saving throw to avoid falling
into the stream.
Mists: Anyone standing in the mist-filled squares
can access the skill challenge. See SC1 below.
Ceiling: The ceiling of the cavern is 50 feet above
the floor.
Western Wall: Along the western wall is a vertical circle with short forks of lightning emerging
from the circumference. This is the portal to the
lich’s stronghold and “Grasp of the Mantled Citadel.”
Creatures within 5 squares of the portal can see a
shimmering image of the Forest of Twisted Souls in
Vaerothim (PCs who saw the tapestry in the Cavern
of Statues can make a DC 25 Perception check to
make the connection ), but the portal doesn’t work
without the key of betrayal, which is the Sword of Kas.
Southern Alcove: This disused alcove appears
to hold no more than rocky debris, but when Imrissa
dies, an illusion fades away and Arantor’s hoard is
revealed. Treasure parcels L, M, N, and O are here,
along with the Sword of Kas (described below). When
the illusion drops, Kas appears near the cavern


